
Micro scratches on your car’s surface can be frustrating, especially when you’ve taken the time to maintain and care for your vehicle. These tiny imperfections can result from a variety of causes, such as washing your car with a rough cloth, minor contact with debris, or even normal wear and tear. Fortunately, with the right techniques and tools, removing micro scratches from your car is entirely possible. In this guide, we’ll cover the step-by-step process to eliminate those pesky scratches and restore your car’s shine.
Understanding Micro Scratches
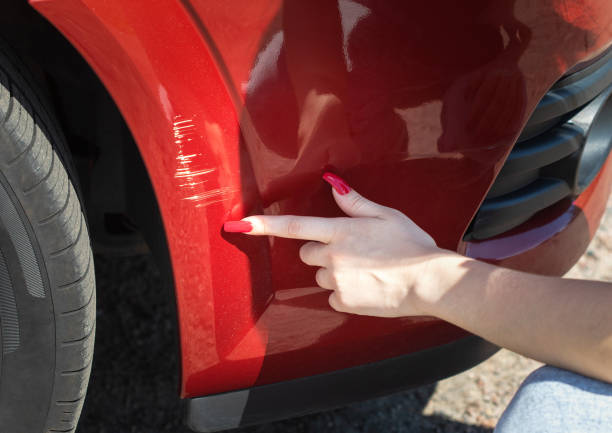
Before diving into the removal process, it’s important to understand what micro scratches are. Micro scratches, also known as swirl marks, are very fine scratches that occur on the outermost layer of your car’s paint, called the clear coat. These scratches are generally shallow and don’t penetrate into the underlying paint. They often become visible when light hits your car at a particular angle, giving the surface a dull or hazy appearance.
Micro scratches are typically caused by improper washing or drying techniques, such as using dirty towels or applying too much pressure while cleaning. Over time, these tiny imperfections accumulate, especially on darker-colored cars, making the paint appear less glossy and smooth.
Tools and Materials You’ll Need
To effectively remove micro scratches from your car, you’ll need a few tools and materials. Fortunately, these items are widely available at automotive stores or online. Here’s a list of what you’ll need:
- Microfiber Towels: Microfiber towels are gentle on your car’s paint and are essential for buffing out scratches and applying products. Avoid using regular towels, which can cause further damage.
- Car Wash Soap: A high-quality car wash soap is important for cleaning your vehicle before addressing the scratches.
- Clay Bar: A clay bar helps remove surface contaminants from your car’s paint, allowing for a smoother finish.
- Polishing Compound: This compound is used to smooth out the surface of your car’s clear coat, helping to eliminate micro scratches.
- Scratch Remover: Scratch removal products are specifically designed to target light surface scratches and restore the paint’s shine.
- Car Wax or Sealant: After removing the scratches, applying a wax or sealant helps protect the newly restored surface and provides added gloss.
- Dual-Action Polisher (Optional): While not necessary, a dual-action polisher can speed up the process and ensure a more even finish.
Step 1: Wash Your Car Thoroughly
The first step in removing micro scratches is to give your car a thorough wash. This helps remove any dirt, dust, or debris that may be sitting on the surface, preventing you from scratching the paint further when working on the scratches.
- Rinse Your Car: Begin by rinsing your car with water to remove loose dirt and debris. Use a hose or pressure washer to thoroughly wet the surface.
- Wash with Car Soap: Use a high-quality car wash soap and a clean microfiber wash mitt to gently wash your car, working from the top down. Avoid scrubbing too hard, as this can cause more scratches.
- Rinse and Dry: After washing, rinse your car off with clean water and dry it using a microfiber towel. Make sure the surface is completely dry before moving on to the next step.
Step 2: Use a Clay Bar to Remove Surface Contaminants
Once your car is clean, it’s time to use a clay bar to remove any contaminants embedded in the paint. These contaminants can contribute to micro scratches and hinder the polishing process, so it’s important to remove them.
- Prepare the Clay Bar: Knead the clay bar until it’s soft and pliable. Use a clay bar lubricant or detailing spray to keep the surface lubricated.
- Clay the Surface: Gently glide the clay bar over the car’s surface in a back-and-forth motion. You’ll feel the clay bar pick up contaminants as you work. Make sure to keep the surface well-lubricated to avoid further scratching.
- Wipe Clean: After claying an area, use a clean microfiber towel to wipe away any residue. The paint should now feel smooth to the touch.
Step 3: Apply a Polishing Compound
Now that your car’s surface is clean and free of contaminants, it’s time to apply a polishing compound to address the micro scratches. Polishing compounds are mildly abrasive, allowing them to smooth out the surface and reduce the visibility of scratches.
- Choose the Right Polish: Select a polishing compound designed for light scratches and swirl marks. Ensure it’s appropriate for use on your car’s clear coat.
- Apply the Polish by Hand or Machine: If using a dual-action polisher, apply a small amount of polish to the pad and spread it over a section of your car. If working by hand, apply a small amount of polish to a microfiber applicator pad.
- Work in Small Sections: Begin polishing in small sections, working in circular motions to evenly spread the polish. If using a machine, move the polisher in a crosshatch pattern (horizontal and vertical passes) to ensure even coverage.
- Buff the Surface: After polishing, use a clean microfiber towel to buff the surface and remove any excess product. The micro scratches should be significantly reduced or completely gone at this stage.
Step 4: Use a Scratch Remover for Stubborn Marks
If some micro scratches are still visible after polishing, you may need to use a dedicated scratch remover. These products are designed to specifically target scratches and imperfections.
- Apply the Scratch Remover: Squeeze a small amount of scratch remover onto a microfiber applicator pad or cloth.
- Rub in Circular Motions: Work the scratch remover into the affected area using gentle, circular motions. Apply light pressure and continue rubbing until the scratches start to fade.
- Wipe Away Excess: Use a clean microfiber towel to wipe away any remaining product and assess the results. Repeat the process if necessary for deeper scratches.
Step 5: Protect the Surface with Wax or Sealant
Once you’ve successfully removed the micro scratches, it’s important to protect your car’s paint with a coat of wax or sealant. This will help shield the paint from future damage and enhance the shine of your car’s finish.
- Apply the Wax or Sealant: Using a foam applicator or microfiber pad, apply a thin layer of wax or sealant to the entire surface of your car. Follow the manufacturer’s instructions for proper application and drying times.
- Buff to a Shine: After the wax or sealant has dried, use a clean microfiber towel to buff the surface to a high gloss. This will leave your car looking smooth and shiny, with the micro scratches effectively eliminated.
Preventing Future Micro Scratches
Now that your car is looking flawless again, you’ll want to keep it that way. Here are some tips to prevent future micro scratches from occurring:
- Use Proper Washing Techniques: Always use a clean microfiber wash mitt and car-specific soap when washing your car. Avoid automatic car washes that use harsh brushes, which can cause micro scratches.
- Dry Gently: After washing, dry your car with a microfiber towel, applying minimal pressure to prevent scratches.
- Regularly Wax Your Car: Applying wax or sealant every few months creates a protective layer on the paint, helping to prevent scratches and keep the finish looking shiny.
- Be Mindful of Storage: When parking your car, try to avoid parking under trees, which can drop debris and sap onto your vehicle. Using a car cover can also help protect your paint from external elements.
Conclusion
Removing micro scratches from your car is a manageable task that can be accomplished with the right tools and techniques. By following the steps outlined in this guide, you can restore your car’s paint to its former glory, making it look smooth and shiny once again.
And if you decide to have a professional handle the job, remember to ask yourself, “Do you tip mobile car detailers?” After all, they’re helping you maintain your vehicle in pristine condition, and tipping can be a great way to show your appreciation for their hard work.
With a little time and effort, you’ll be able to keep your car looking like new, free from those frustrating micro scratches that can dull its appearance.